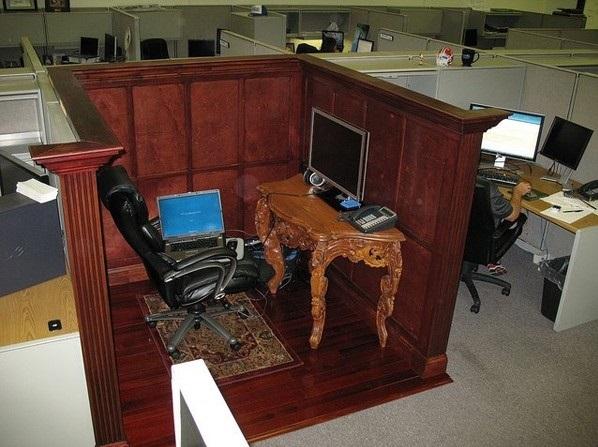
Half Metal Jacket
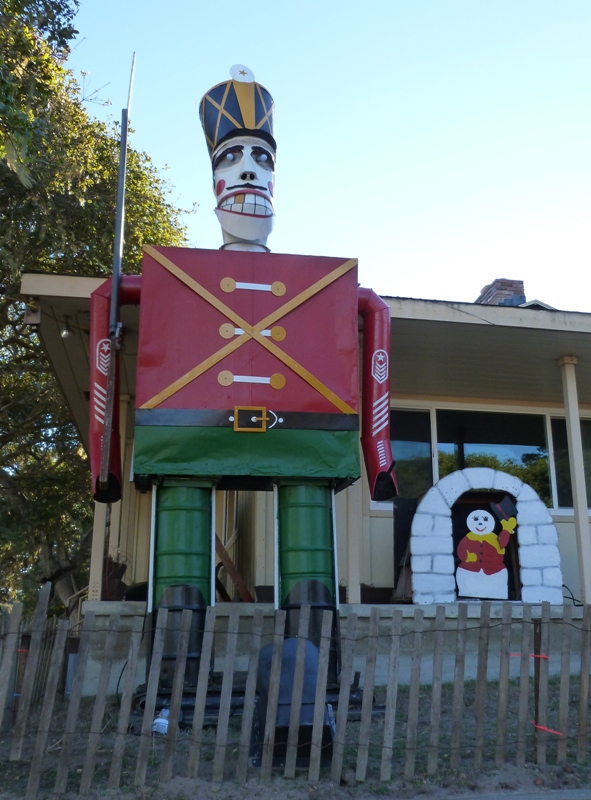
Candy Cane Lane – What this terrible giant does to a six year old I cannot imagine because it scares the flaming Baal out of me….
45 minute rike, Candy Cane Lane is curious, cold, even during the day, little warmth in the bright blue sky. SPAR check comes in at just the right time, so too does the match to my Katana locking mitre joint bit.
FORWARDDAY –
Accomplished what has been ardently desired here at JohnsonArts for four year. No, Kate Blanchet did stop by to pledge me her troth, or anything else. But something prosaic, as you shall read.
Off day from The Rike, thus provisioning was the order of the frozen morning. As cold as it gets here where it’s never really quite summer and it’s never really quite winter. To Trader Joe’s for the early mid-week O’boom rations, thence to Homeless Depot. I need drawer bottoms. No, not for my worn out union suit, but for wooden pull-out, push in sliding appurtenances. I was hoping for the cheap, I mean affordable lanai board, but what was in stock was 0.5 cm ply. Good enough and so was the cost: $15.
The throng is here at The Dump for cut-rate chicken wire and moldy lounge chairs.
Skipper out to The Dump where the prices must actually be negative numbers given the throng, had to park in Salinas and take the bus back. Nothing for JohnsonArts, Toxic Table barren, like my hopes.
Better tidings at Grocery Cheaplet where cheese deals could be had.
Last stop – Ka-Nob Hill Market for Palermo Rolls, tomatoes and navel oranges.
Now, to The Advancement – Locking mitre joints on the drawers for the Half Metal Jacket Cabinet.
Yesterslack, the new, but same as I already have Katana locking mitre joint bit arrived in the day’s post. I refer you to the previous post “Jacket Slackit” for the background on why I needed two of the same router bits. Particularly in light of prizing out of our Accounting Department the authorization to tap into what is a nearly empty treasury.
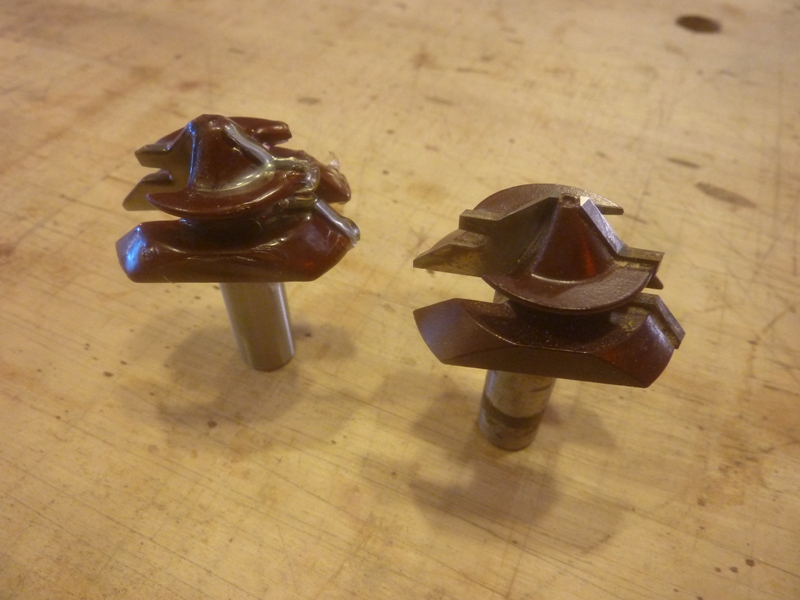
The twins – one for the horizontal and one for the vertical router table.
The one bit goes into the typical router-goes-up-and-down in the router table; and the other installed in the not-typical router-goes-in-and-out router table.
In brief, I needed two of the same bit because the set up to get the bit to cut the proper profile on the end of a board is an equation with two unknowns: 1 – bit height; and 2 – bit penetration. By having two bits, I can run the boards flat on the table, which greatly
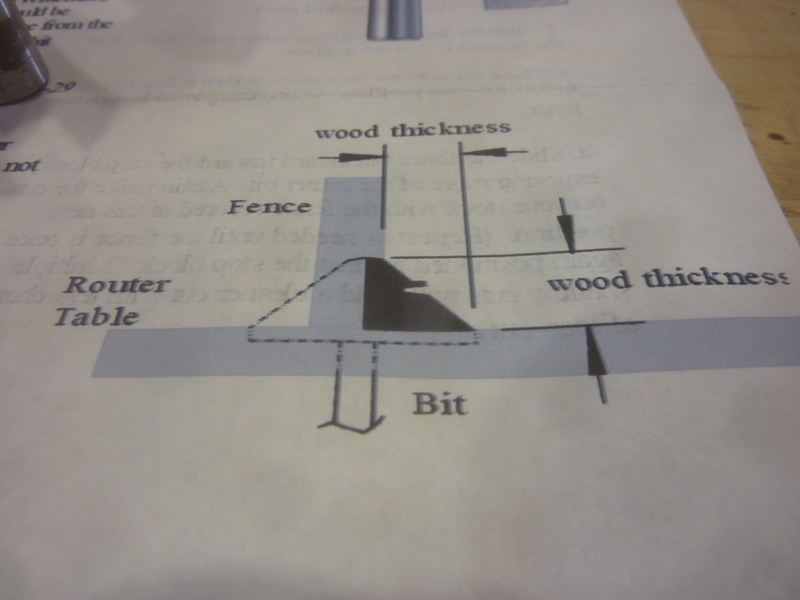
It all looks so simple on paper ….
increases accuracy.
Those smart chappies at Katana were trying to do me (and all router table users) a favor by engineering one bit to do both cut profiles. Probably a Real Guy could figure out how to run a board end edge down across the bit to make the complimentary rout, I never could.
Thus the need for two. One in the vertical, normal router table which makes the front and back faces of a drawer, or any four-sided structure that requires a locking mitre; and the other in the horizontal router table which makes the corresponding, and locking profile on what will be the sides of a drawer.
Set up, including the installation of anti-chip out backing boards for the sleds took about an hour. Then it was establish the proper (I guessed) profile on the vertical table, then tried to organize its complementary shape on the horizontal table
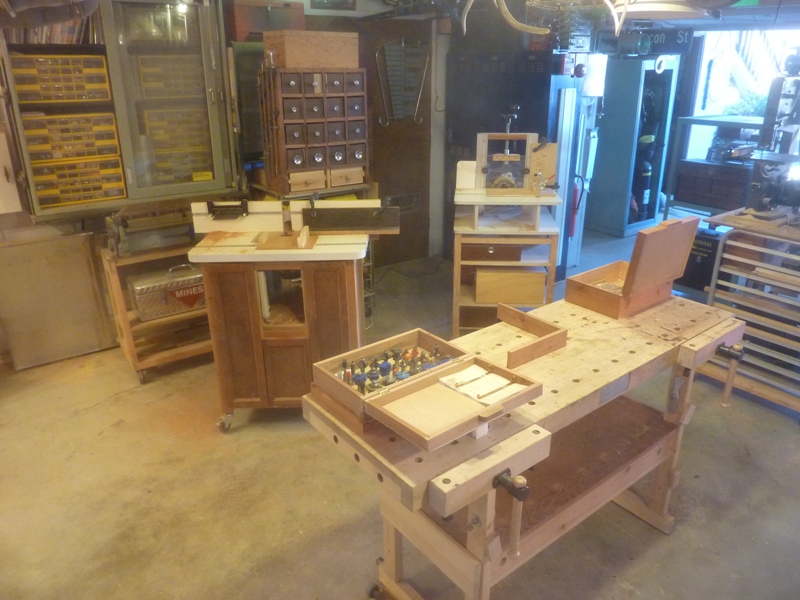
The normal, vertical-oriented router is on the left, yonder is the router horizontal – both ready to make JohnsonArts proud.
I took only about a dozen trials to zero in on the right config, something I’d tried to do with only one bit a dozen times before, all FAIL.
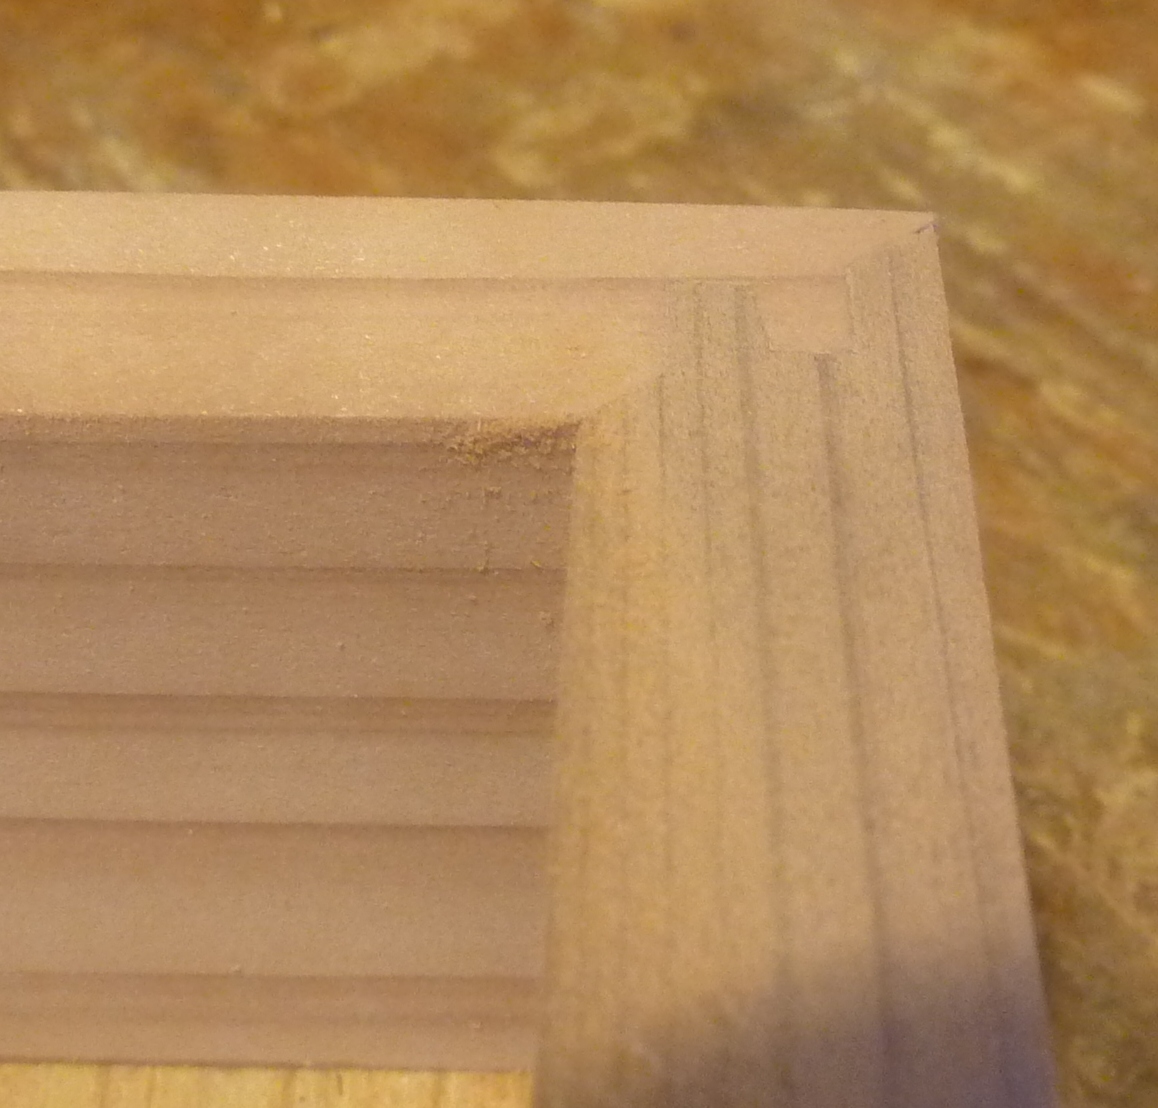
The proper fit for a locking mitre joint.
I’m set up, the locking mitre joints ready, all I need do is cut the drawer sides and front and back to final length, then let fly. I’m exhilarated.
Forming the side profiles on the horizontal table turned out to be less punch the button and go than was running the profiles out the vertical bit. Don’t know why, but thanks to copious spares, came out the end with enough for the four drawers needed.
Feel like I passed a graduate level course I’d failed a hundred times.
Kerfed the drawer sides to accommodate the ply floor, then cut the floor.
Just enough project mojo left to re-make the cabinet back. Last week I’d cut and bent-over the edges for the metal plate intended to form the back of the cabinet. But a kilter, a few degrees off square. Resolved to do better. And I did. Paying greater attention to and more competent use of my grandfather Elmer’s carpenters square, better cut the 32 gauge sheet metal and better and more accurately formed the bendovers. Still, had to carve out 2 mm of inset on the back of the cabinet due to oversizing just that amount on the sheet metal.
I glow. Even without O’boom
SPARRINGDAY –
The SPAR in-home assembly adventure continues, but not the way anybody would like.
The job’s in Salinas – I must depart Elysium for to travel to the real world – and Google maps shows Anita’s address of 42 W San Joaquin to be a condo. There’s no finer fidelity on my SPAR work order. Need to talk to them about that.
Being the (semi) competent Independent Merchandiser I am, I naturally telephone the client to ask wither. No answer but leave a message: tell me your exact location, and can you be there before 2 (which was the pre-arranged time for my arrival)?
No response by the time Way Early Johnson leaves an hour and ¾’s before the appointed 2 PM assembly onset. It’s 17 miles to Salinas, but you have to get out of Elysium to get on the Pathway to Purgatory AND I wanted to drop off a couple of saw blades at The Swede’s, far side of town.
The Swede was happy to sharpen my table saw blade, yep, Festool circular saw blade, can do, The Prof’s circular saw blade, no prob, 6” razor saw with 20293839 teeth/inch. Nope. Three out of four ain’t bad.
It’s about 1 o’clock, might take me an hour to suss out of the condo complex the den of Anita. First two doors I knock on, no, they don’t know Anita. Next two doors either nobody’s home or I look like Bad Seed through the peep hole.
Fifth door – BINGO!
Anita and her housemate are in sad trim. The guy (used to be a champion free-style wrestler) has a bum knee and a bad back, limps about with a cane and a pained expression. Anita has that haggard, emaciated look that says Stage 4 of the Big C. These are people to whom life has not been kind. But they have a tense, initially yippy Chihuahua who has the smarts to turn off the nerves and come over to get acquainted.
That was the good news.
“Did I bring the desk?”
I don’t deliver, I just put them together.
While Anita gets on the blower with Office Max – the desk was supposed to be assembled Monday, but I bagged that and so the desk was supposed to be on site three days ago – I look over the intended room and spot for the new desk. Let us say that #6 42 W San Joaquin is jumbled. There’s hardly room to walk let alone put a desk together and there’s no hole in the room in which to put one once it is assembled.
And so this cock-up on Office Max’s (or whoever they contract with to deliver their wares) was a boon both to your Independent Merchandiser (because it turns out SPAR will compensate me for the hang-fire) and for #6 as it gives them some time to figure out how to shift their shit to make room for the new furniture.
Right.
If the desk is delivered and I get the return visit, it will be your Independent Merchandiser who will be tasked with the shit shifting.
INTERVIEWDAY –
Yes, an interview. Really.
And we had a prowler of the precinct, a stupid one who left open the southwest postern gate. Maybe we see interlopers here each night, but not one that announces his (her, its) presence. Disturbing.
To that Interview – a dream job …. Well, not actually THE dream job, which would be something like Beer Quality Control Inspector and Sex Education Instructor at St. Slippery’s By The Sea Girls School Brewing and Carpentry Vocational Reformatory, but at least a paying billet in an arena with which I have had a life-long interest. No, not Wood Porn, but history.
The prospective role is a sort of high-powered Administrative Assistant on contract to The City of Monterey that seeks to liaison and facilitate the missions of the myriad of stakeholders in the historic capital – that’s capital with an A – that is Monterey.
Or something like that.
My interview was with Dennis Copeland and Michael Green, City Historian and Head of the Monterey State Parks, respectively. Both men with which I am acquainted, which made the interview relaxing. At least for me.
They underhand tossed me up a series of pumpkins at which I swung for the fence, such as “Tell us how your experience is relevant to Historic Monterey?”
“While at Spacely Sprockets as Under Assistant Dustpan Handler working the Namibian Collegium for Sod Studies account, I instituted new llama breeding techniques which increased the fecundity of and profits by 23.8 nano-furlongs.”
Hit my marks.
You can always do better, but post-mortem indicates a personal satisfaction quotient of 93.6%. Probably any of the other candidates have the requisite tool kit to do the job; but with me, they get not only my organizational and process rigor, but technical chops as well, which will be needed because The City recognizes it needs a total revamp of their current web site.
I asked for the job – but no decision until January.
To Homeslice and The Shop.
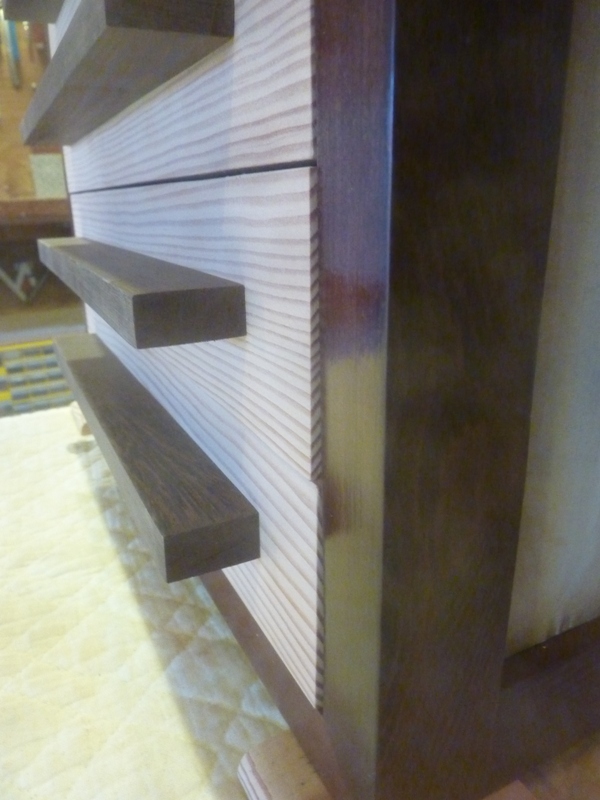
Glue up the other 3 of 4 drawers for the Half Metal Jacket Cabinet and can now turn to the drawer faces. Drawer faces that will transform this desk-top dirigible hanger for flying baguettes into ….. well, a better looking table-top metal clad miniature flying baguette hanger.
Fir faces, heavy with grain, the pulls to be zebra wood. I’m making that up, I don’t know what this dark, big, open grained seamed cellulite is. Bubinga? Better call Wildman, from whom I cadged it and ask him.
Anyway, I figure the pulls for the drawer fronts to be thin slats spanning nearly the entire front width of the drawer faces, and as spice for the goose, of diminishing thickness from top to bottom. Fun!
Or would have been when I got to the planer to form those four pulls down to diminishing thickness top-to-bottom.
Flip the planer switch.
Nothing.
This can’t be right.
Off the cover and dork about with the Dead Man’s switch, which accomplishes nothing. Knowing not what else to dick around with, pull the motor bushings. They look fine, plenty of …. well plenty of whatever it is that they are made from. But sometimes simply taking things apart and putting them back together exorcises the demons. And so it was in this case. Bushing back in, flip the switch: Hosanna!
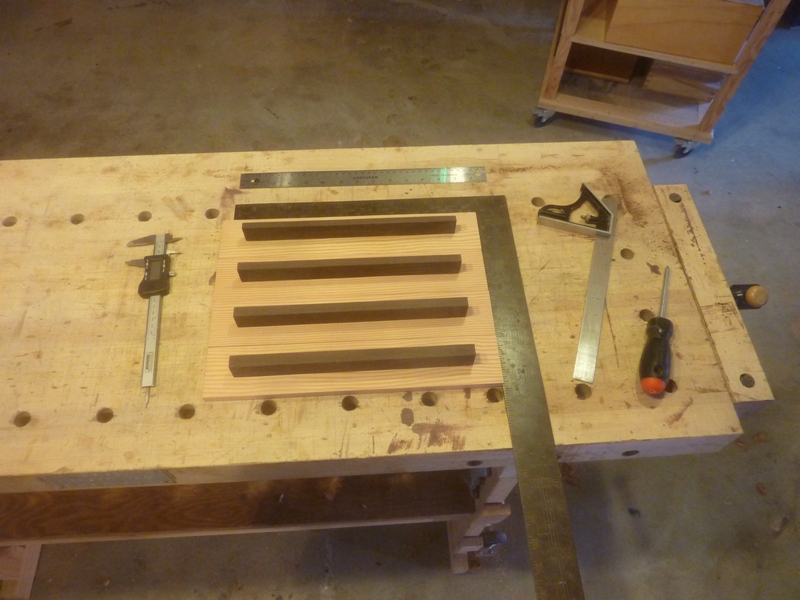
The drawer faces and the pulls during my Parallel and Square Incantations.
Plane down the zebra wood, or whatever it is to a uniform front-to-back, then plane down sequentially from top-to-bottom of the intended pulls: 14, 12, 10, 8 mm. More FUN!
The challenge next is to center the pulls side-to-side on the drawer faces and top-to-bottom.
Oversized the screw holes so that I’d have some slop. Slop needed to shift the equi-length pulls precisely amidships on the drawer faces and vertically aligned.
Somehow, the gods ignored me and allowed this to occur. Pray NOTHING.
Gladdened at this Rubicon Crossing, wondered at whether the nascent flying dirigible baguette hanger didn’t want some sort of legs or feet. It looks squat and clunky just sitting there. Perhaps runners lengthwise. Perhaps.
We shall see what we shall see. If we’re lucky. Send four leaf clovers.
STRUGGLEDAY –
Fitting the drawers to the Half Metal Jacket Cabinet was more difficult that I expected.
The sides of the drawers must be kerfed to fit the cabinet slides with no overlap of the fronts, which have not yet been installed. Fun?
There are three balls to juggle. One – the drawers must be kerfed such that they don’t overlap, obviously. Two – and less obviously they must fit into the drawer slides so that the drawer fronts – not yet installed on the drawers – do not overlap. And Three – of course, the kerf must be matched to the drawer slides tight enough up-down and in-out so that the drawer can slide, yet with slop minimized.
Thus I had to eye-up the kerf placement with the third eye on where the drawer fronts will want to be positioned. In retrospect, I should have marked out the drawer front positions FIRST, and then marked for the drawer kerfs. You learn a few, you learn a few more.
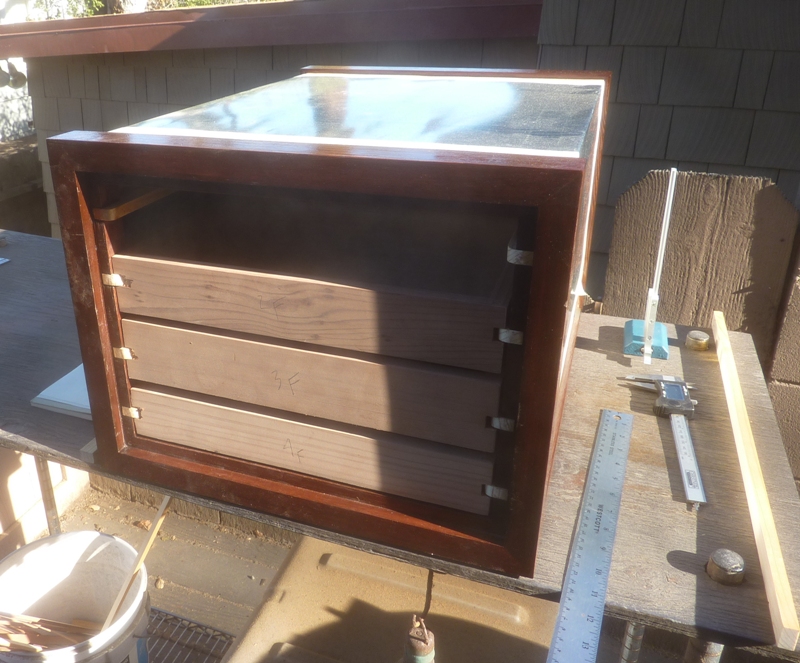
Now that the drawers slide in and out (mostly), can affix the fronts. To do this, I pre-drilled through the front of the drawer for the drawer-face mounting screws, then punched in three brads into the front face of each drawer, the heads of which were then cut off. Placing beer coasters as spacers bottom and sides to the drawer fronts, I then slid the drawers into the faces (the back of the cabinet is open) and clamped them together. This allowed the artisan (if artisan he be …. ) to remove the proto-assemblage from the cabinet to the workbench where the mounting screws were driven home.

Having no Automatic Drawer Front Centering Spacing Assembly apparatus, must fall back on beer coaster employment.
This technique worked well enough for the lower three drawers, but would not for the top drawer as there was no clearance for the clamps. Instead, inserted the drawer, positioned the drawer face, and then clamped over the drawer face a piece of ply. From the open back of the cabinet, I then gently with resolve forced the drawer against the back of the face. I could see the marks of the cut-off brads and this allowed both the face and the drawer to be removed from the cabinet and re-joined for screwing.
Overall, the drawer fit is not horrible, but needs fine-tuning. Or not-so-fine tuning as the drawer faces are proud of the case front varying from itsy-bitsy to 3 mm. Fork. Something must be done, something that I’ll think of of the Midnight Study Hall.
This variability defines my tiny brain – the faces are all the same thickness, the inset is all the same. WHA!!???
Also, the cabinet needs legs or feet. Opted for the square on each corner, made of fir that will remain unstained so as to contrast, as will the drawer fronts, with the red mahogany stained cabinet frame. I should have just nailed on the feet instead of laboriously pre-drilling each foot and pre-drilling each under-corner of the cabinet, but with screws, if I don’t like the look tomorslack, I can remove them more easily than had they been nailed.
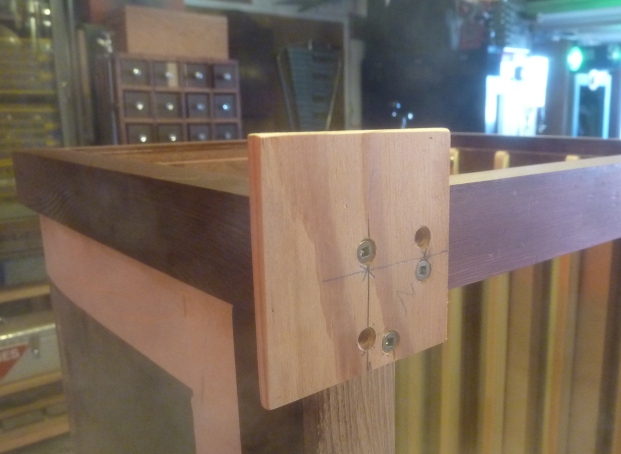
Feet, while ugly, are necessary, and right glad I am that I screwed them on rather than nailed.
And writing of nailed, 151 years ago, Ambrose Burnside, the well-intentioned, affable but hopelessly out of his depth Command of the Army of the Potomac (the fifth in 19 months) condemned nearly 11,000 Union troops to death or wounds in an idiotic, forlorn frontal attack on the entrenched (Lee had had two weeks to prepare his defenses while Burnside sat on his hands across the Rappahannock River waited for pontoon boats to arrive from Washington), elevated Confederate position of Marye’s Heights at Fredericksville. Confederate losses were less than half the Union losses. Because of the Confederate triumph, Lee was quoted after the massacre as saying, “It is well that war is so horrible, otherwise we would grow too fond of it.” That never occurred to Napoleon.
FORKDAY –
As in all forked up trying to make the Half Jacket Slacket Metal Cab drawers fit flush with the case.
The variability of drawers standing proud of the case front is perplexing. All four drawer faces were planed to the same thickness, the case inset was all done on the table saw at the same time to the same setting. I’m being bedeviled by Shop Gremlins.
The Fix – I figure to use my bull nose plane to escallop out the 3mm more depth to allow the drawers to close flush. Except that I do not have a bull nose plane. Make the mistake of using my rabbet plane which not only is totally insufficient as the blade cannot purchase to the corners of the inset and has the exciting wonderful side benefit of scaring the outside front of the case with its adjustment screw.
Marvelous.
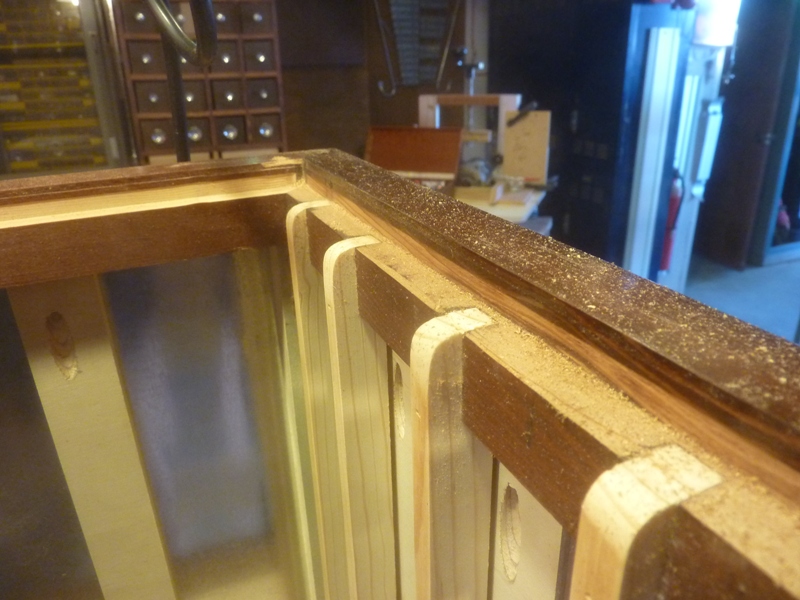
The trim router with the pattern bit was today’s hero.
Yes, I could have removed the drawer faces from the drawers, removed the drawer pulls and then run all the faces through the planner, but that would then entail the painstaking re-assembly.
Plan B – deploy the trim router.
I fear it. I fear all routers. I fear all power tools, BUT if I am careful, dexterous, nimble, sure, confident and masterful, I can make the trim router do what I want, which is to excavate now 5 mm of the inset because I have to sand down the case front to efface those craters put in by (me) the unsuitable rabbet plane.
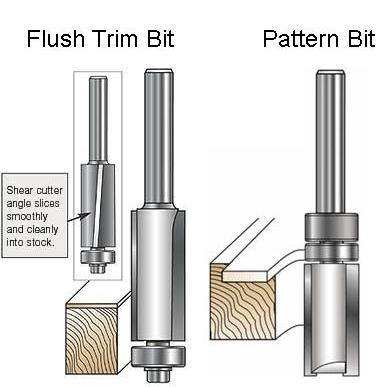 Fortunately, I have an upside down flush trim router bit, or the more orthodox terminology would be a pattern bit.
Unlike flush trim router bits, which have the guide bearing on the distal end of the bit, a pattern bit has the guide bearing above the cutting blades. This allows the artisan to follow a pattern, or jig with the bearing to duplicate the shape on the workpiece below. Even the Republican obstructionists couldn’t say it wasn’t up and running.
All I need do is set the depth of the bit for 0.5 cm below the current surface and run the thing around the inside of the case. And it was a good Odin Damned Thing I didn’t nail on the cabinet feet as they would have interfered with the proper travel of the trim router. As they were screwed on, they were easily screwed off. The whole re-work rout-out worked better than a bull nose plane would have. But I still need one.
Now all that is required for this re-work is to sand down the face of the cabinet, which is done chop chop. Some stain and no one is the wiser. Say Nothing.
Also in the Say Nothing Department – you never read, heard, or witnessed what I did next, which is to scheme on the Secret Hiding Place in the back of the cabinet.
Due to a breakdown in communication between our Design Department and our Blueprints Shop, the drawers are about 10 cm short of filling the cabinet front-to-back. This provides a space for Secret Doings.
I’ll put in a false back inside the cabinet and behind that I’ll ….. I’ll put in something else TBD.
First, lam out a sheet of ply notched to clear the drawer slides, then cut a piece of sheet metal to face the false back.
Our Department of Sneakiness thinks that the casual observer, if observer there be, who peers into the cabinet should a drawer be removed would sense the gleam of sheet metal and since the Real back of the cabinet IS (will be) sheet metal would assume he/she/it is seeing the actually back when in slackt it will be the false back and thus never suspect the Secret space within.


 The Train Jig-Saw Triptych
  Catafalque
  The Antique (almost) Valentine’s Day Card Cabinet
No comments yet.